How to make a vintage analog phone work with a VoIP (no landline needed)
This tutorial also details how to make a vintage (or more modern) answering machine work with your VoIP analog phone. This tutorial is long, not becuase this is difficult, but because I like to be detailed.

Step 1. Get an "Analog Telephone Adapter" device.
An "Analog Telephone Adapter" (or ATA for short) is a device which you plug your phone's jack into. Once we plug an ethernet cable into the ATA and configure the device, it will carry the VoIP signal from the internet to the analog phone.
There are a number of different ATAs to choose from. I use a Grandstream HT801.
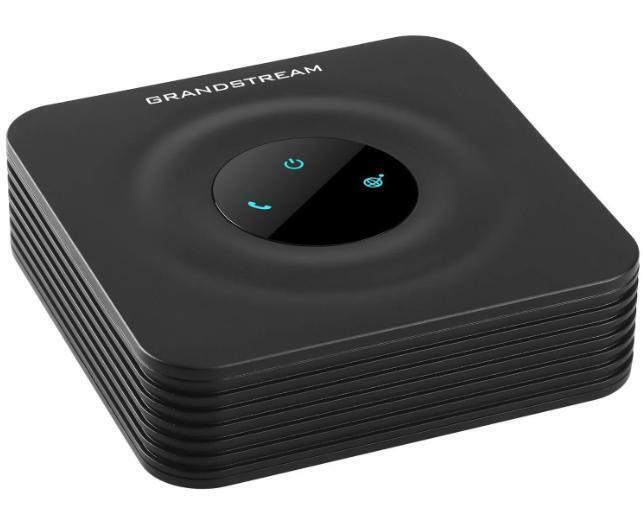
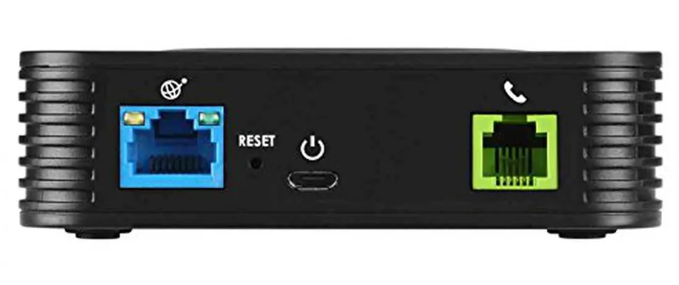
Front and back of an Analog Telephone Adapter (ATA), the Grandstream HT801.
The Grandstream HT801 has one port for only one phone. However, you can attach an adapter that allows you to have multiple phone jacks go into the input port.
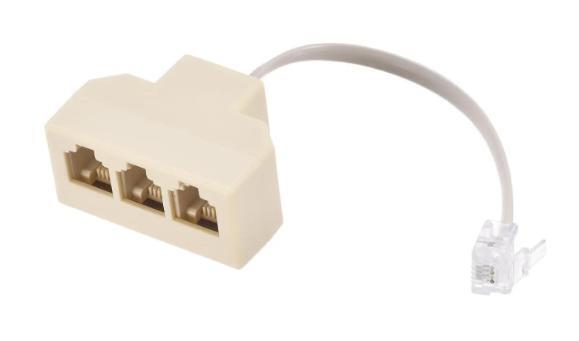
Phone jack splitter if you want multiple phones. All will go to the same phone line, not separate numbers.
Alternatively, you can get the Grandstream HT802 which has two ports. These two ports on the 802 can be confiugred for different phone numbers.
You will plug your phone jack into the phone port on the ATA. Then, take an ethernet cable going from your router (your router is where you get your internet) and plug the ethernet cable into the internet port on the ATA. This does not mean the phone will work yet. We still have to configure the Grandstream and get a virtual phone number.
Step 2. Getting a virtual phone number (also known as a VoIP).
Now we need a phone number so we're able to make and receive calls. To do this, we need a virtual number (VoIP, which stands for Voice over Internet Protocol). A VoIP functions just like any regular phone number.
There are many different VoIP providers to pick from, but we need a provider that provides up with a "SIP number". Many providers don't provide this infomation, but here are some that I found do provide this:
Voip.ms
Voipo
Anveo
Callcentric
HOWEVER, those providers are extremely difficult to sign up with. If you care even a little bit about privacy, I wouldn't go with those companies. Their flagging system is extreme, on every one I tried I was asked to upload a government issued photo ID, to verify the account with a SIM verification, and would get locked out of the account for using a VPN. It was a nightmare. If you don't care about privacy and you're more than happy to bend over and let them give you a colooscopy exam, then go ahead and use one of them.
However, I found a much better VoIP provider that is easy to sign up with if you value privacy.
Go to: https://jmp.chat
Jmp.chat is a privacy-friendly VoIP provider. You can also pay for your account using crypto such as Shitcoin and Monero, and credit card if you don't use crypto currency. Setting up your account with them can be a little convoluted if you're unfamiliar with certain things. I will explain how to sign up later. First let's pick a number.
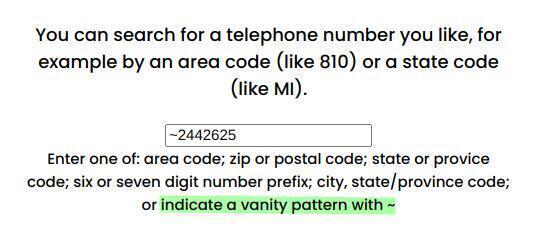
Step 3. Picking a number with Jmp.chat (and how to get a vanity number).
On Jmp.chat's website there is a box where you can search for the area code or vanity number you desire.
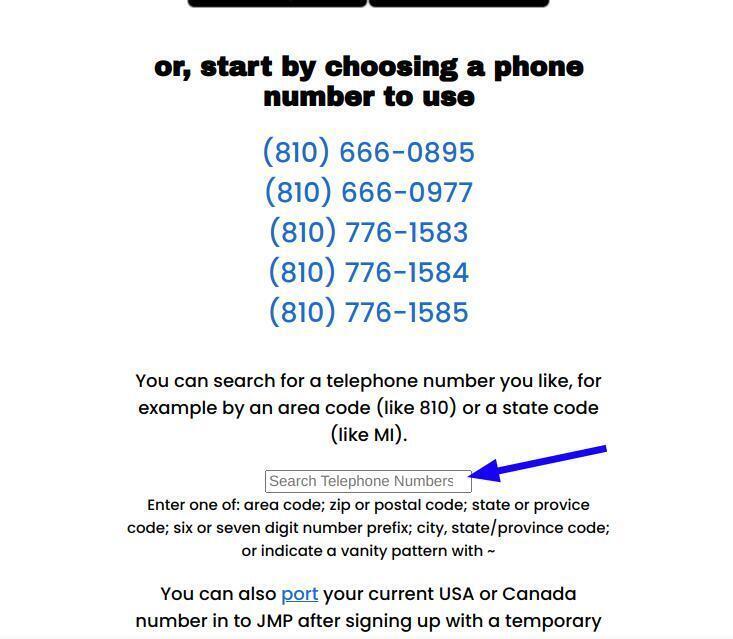
If you want a vanity number (a number which spells something, for example mine is 725-CUM-FART), then you will have to add a tilde mark ~ before you input the vanity number you desire. Note to not put in an area code, only the vanity number part, the last 7 numbers of the phone number.
Here is me searching for the vanity number "BIG-COCK"
And here are the results which vary in area codes. Not all states have this number available, and sometimes your vanity number won't be available anywhere. Click on the number you like.
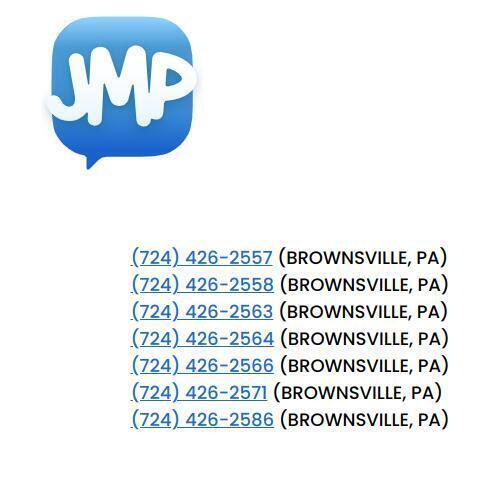
(Brownsville would be a good area code for a poop-related number like 724-FAT-SHIT
Step 4. Make an XMPP account
Before we can proceed to purchasing our number and phone service, we need to make an XMPP account so Jmp.chat can send us our account information. We manage our Jmp.chat account using XMPP. You may have never heard of XMPP, so I will give a brief explanation.
XMPP is just another chat protocol. You're already familiar with a lot of different chat protocols - things like e-mail, texting, and a messaging app are all different chat protocols. Things like XMPP and IRC are just another way to send and receive messages. Except, XMPP has the ability to be encrypted, making XMPP chat better than something like e-mail.
As stated, we use XMPP to manage our account. Jmp.chat has a chatbot you interact with - it's all automatic. Here's how to create and use XMPP.
Go to: https://xmpp.is/account/register/
They have a list of different domains to choose from to make your account. Just pick any one you like and proceed to make your XMPP account.
Now you need software to use your XMPP account. To make this retard-palatable, (sorry you're not a retard I'm sorry), anyways, imagine you make a new e-mail. Well, you may have a new e-mail address, but you need to visit a certain website to use your e-mail. You need an interface to use your account - so we will use an open source "client" to use our XMPP account. Install software called Gajim, this is how we will access our XMPP account. After you download this software, put in your XMPP address into Gajim (it will look like an email, for example youre4evrgay@xmpp.xyz - this is just an example)
Step 5. Get your phone number and configure your phone account
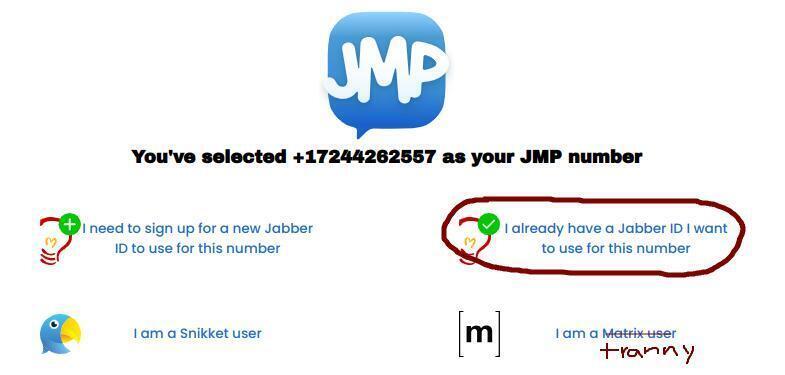
Now we're able to go back to Jmp.chat and proceed with getting our number. Select "I already have a Jabber account", this will be the XMPP account we just made.
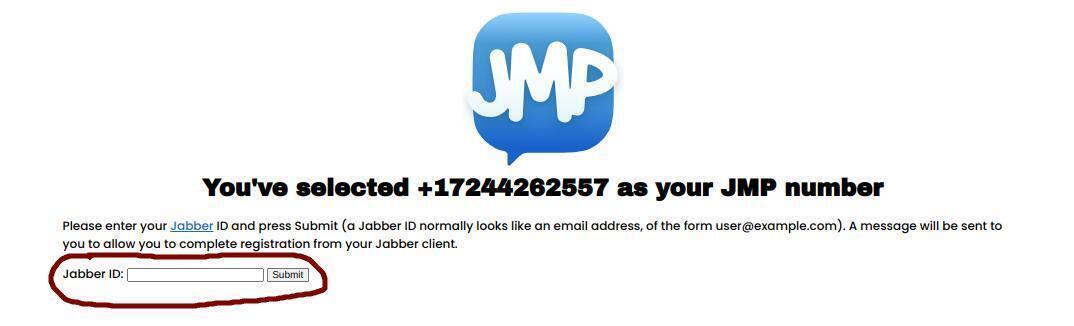
Put in your XMPP address into the box (remember, it looks like an e-mail address).
Now Jmp.chat's automatic chat bot will message your XMPP account, which will appear in the Gajim program/client. Jmpchat's chatbot is called "Cheogram.com", this bot will prompt you to add funds and set up your account.
Typing "menu" to the Cheogram chatbot will list the options to manage your account. Before you can use your phone, you have to play the $4.99 monthly cost, and then add more funds if you would like. The $4.99/month gives you a few hundreds minutes included, and topping up your account is fairly inexpensive. You can see the rates here: https://jmp.chat/pricing/USD#US
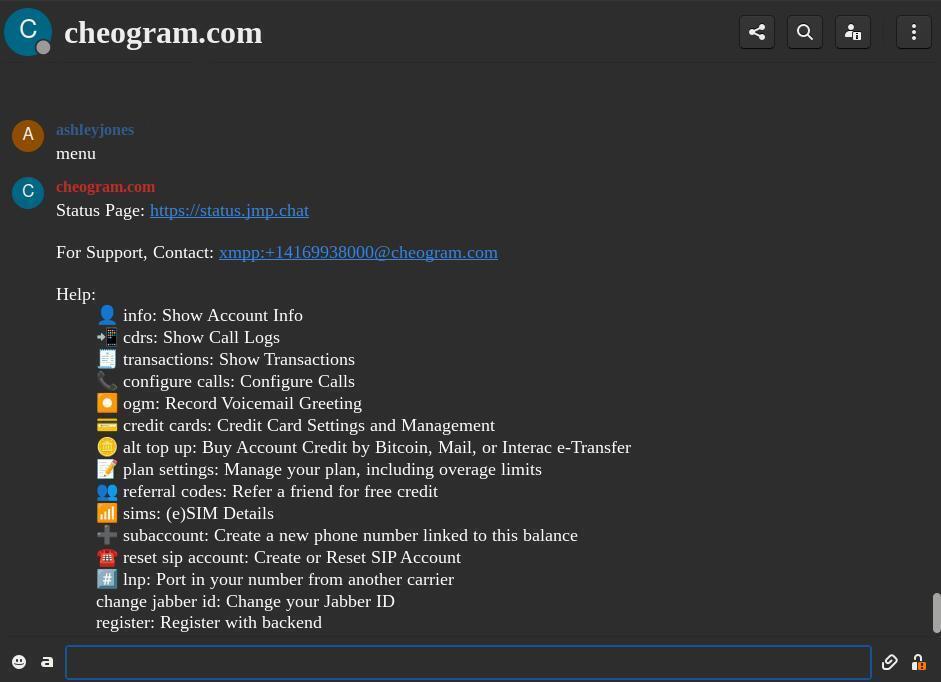
Register, add funds, etc.
Step 6. Setting up your ATA
Now that we have our phone number, funded the account, and configured our VoIP account, we must put in the necessary information into the Grandstream ATA to properly have the phone calls ported from the internet to our phone.
Make sure you have an ethernet cable going from your router to your Grandstream's internet port. Also make sure you've plugged in your Grandstream so it has power. Blue lights should come on indicating that it's functioning.
Your Grandstream's software will be managed on your router's local network. To access your router's local network, you will type the router's IP address into your browser. To find your router IP address (called the default gateway) open a terminal and type:
$ ip route
It should say something like:
default via 192.168.X.X
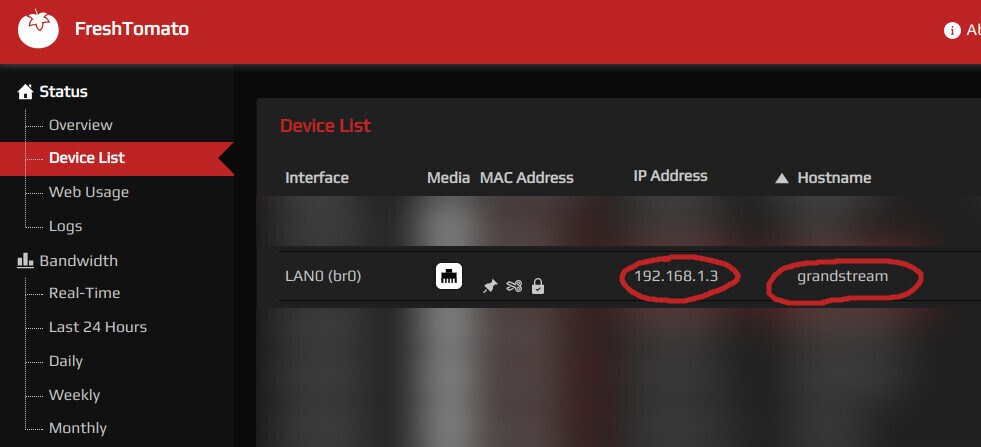
Along with other information. The router's IP address is listed first. This IP address is what we will type into our browser to access our router. Now you should be on your local network/router. From here you will be able to manage devices that are connected to your local network. Since the Grandstream is connected to your router, you should see it in your list of devices on your local network. It will be assigned a different IP address from your local network. You can type the Grandstream's IP address into your browser to access the Grandstream's software. This is how we will add our SIP number to the Grandstream.
You'll probably want to assign a permanent IP address to your Grandstream. Otherwise, it's possible your Grandstream will be assigned a different IP address each time you turn it on or restart your router, meaning when you try and visit the previous IP address of the Grandstream, it won't work.
Luckily most routers will allow you to assign a permanent IP address to a device using something called DHCP (Dynamic Host Configuration Protocol) reservation. In your router's settings, look for the DHCP settings. In there, look for the Grandstream device. You should see an option to "reserve" or "make permanent" and that's it. Now your Grandstream will have that IP address permanently.
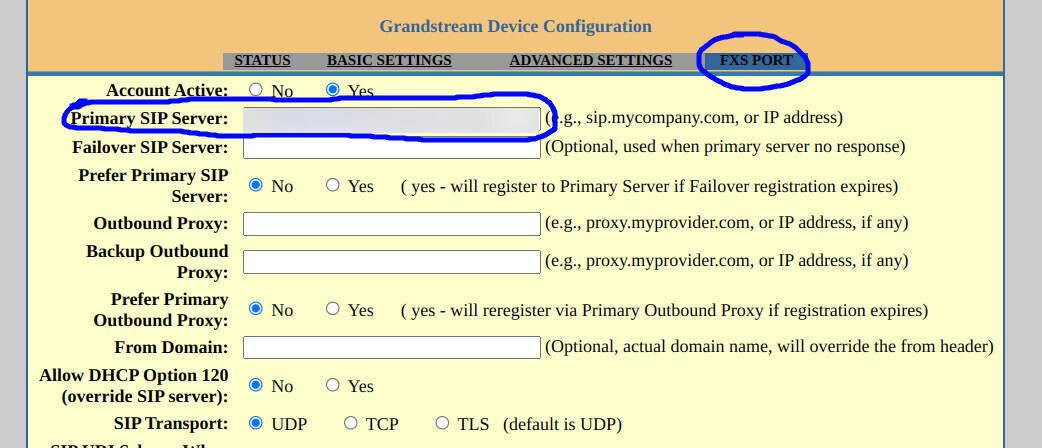
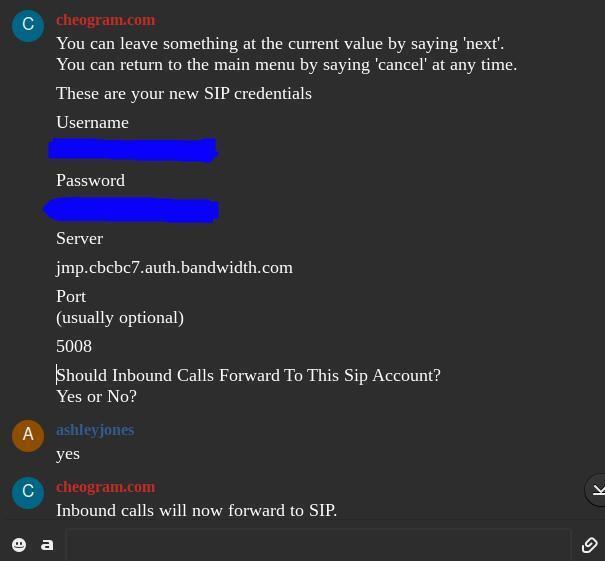
Now go to the IP address of the Grandstream. You will see the Grandstream's software login page. Sign in (default username and password is both "admin"). After signing in, go to FXS port. Ask the Jmp.chat chatbot for the SIP information using the SIP prompt (type "menu" to the chatbot to find the SIP command). Copy the SIP information into and paste into the Primary SIP Server box. You may need to add the port number after your SIP information. The chatbot should give you the port number when you request the SIP information. Put the port number in the SIP like this: jmp.cbcbc7.auth.bandwidth.com:portnumberhere
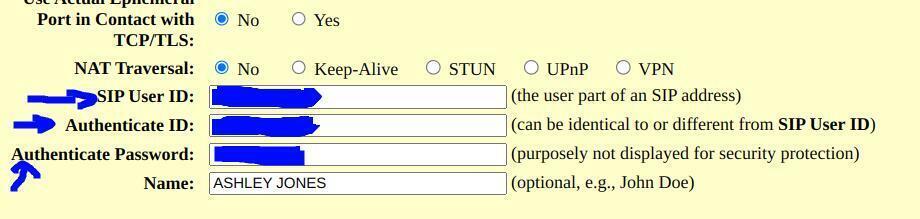
Then scroll down a little until you see "SIP User ID", "Authenticate ID", and "Authenticate Password". Fill out these fields, the chatbot gives you this information when you ask it to with the SIP prompt.
The chatbot will ask, "Should Inbound Calls Forward To This Sip Account? Yes or No?", say "yes". This means all calls will go to that SIP account, which is being ported over to the Grandstream.
If you're using an older phone, such as a rotary phone, or a phone that is not touch-tone, you will need to enable pulse dialing. Ctrl+f for "pulse" and press "Yes" to enable pulse dialing.

Now scroll to the very bottom of the Grandstream's page and press "apply".
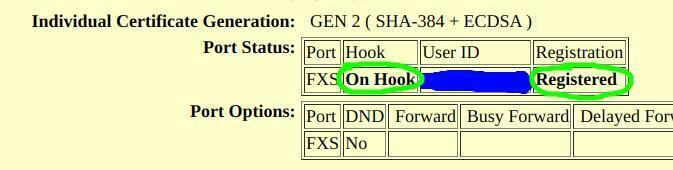
Now everything should be set up correctly. If you go to the "Status" page on the Grandstream, in the box where it says "Port Status", under "Hook" it should say "On Hook" to indicate it's working.
You can test making calls now. I looked up random Walmarts in the US and called them to see if it worked. You MAY have a limit set on your account as to how many calls you can have per hour. My account had a low limit, I think 2 calls per hour. Calls meaning I picked up and the other line was active as well. I asked Jmp.chat support about this and they were able to raise the limit to about 5. This issue may happen for you.
How to have a vintage answering machine work with a VoIP
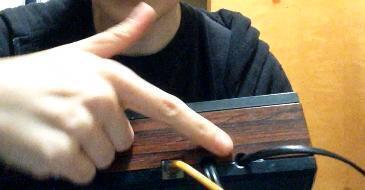
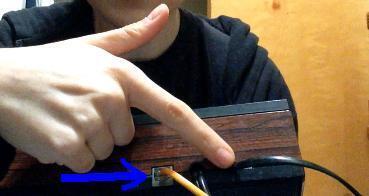
This is very easy to do. All you do is unplug your analog phone from the Grandstream. There should be an outgoing phone jack coming from your answering machine. Here's where my outgoing phone jack is on my answering machine.
Plug this outgoing phone jack from your answering machine into the phone port on the Grandstream.

Now plug your analog phone's jack into the input port on your answering machine.
Now the phone calls will port through the answering machine, then to the phone. Don't worry, your phone will still ring first, and if you don't pick up, THEN it will go to the answering machine.
IMPORTANT: You should adjust your Jmp.chat settings so that your answering machine can pick up first before Jmp's built in voice mail feature takes the message. Prompt the chatbot by typing in "configure calls". It will ask if you want voicemail enabled, say yes. Then it will say:

Set the seconds before it goes to voicemail. This number should be longer than the amount of time it will take for your answering machine to pick up. I set this setting to "60" and it works fine for me.
Tapes for your answering machine
Tapes to use:Your outgoing message tape (the tape people hear when they reach your answering machine) must be a special type of type. Not just any tape. This is because it needs to constantly loop to the start after a short period of time, making the message ready and at the beginning for the next caller. A typical tape is very long and not capable of this. So, you need to get an "outgoing message tape" or "OGM" for short.
You can use regular tapes for the messages people leave. There is usually an A and B side to blank tapes. When one side is filled up with messages, turn the tape to the B side and place it back into the machine. New messages left on the B side will not record over the A side. You can reuse this tape over and over, if you reuse one side, it will re-record over the previous messages.

 NEWS
NEWS
 Poems i made
 WHO AM I???


 Technology